
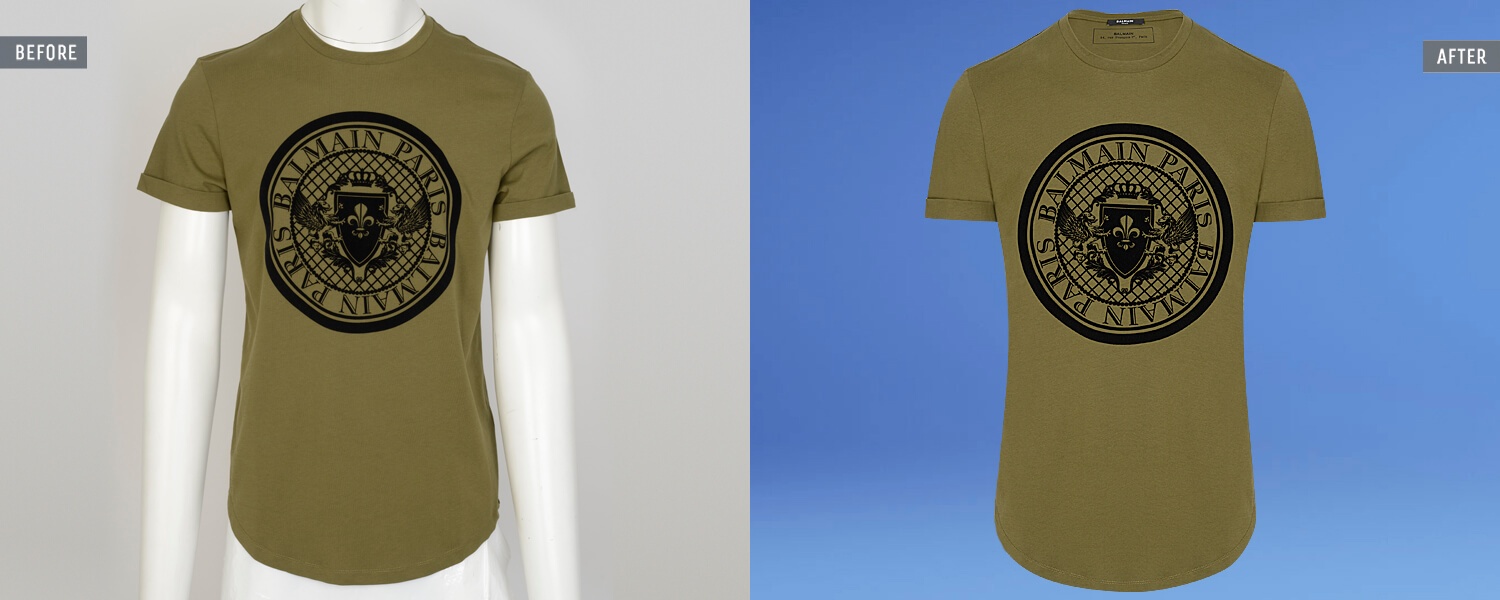
A ghost mannequin edit can only be as good as the photos behind it. Most of the problems we fix in this work were created at the shoot: a neck shot nobody took, a mannequin one size too big, a light that moved between the front and the back. Here is how to approach ghost mannequin photography so the edit is quick, cheap and clean.
What ghost mannequin photography is
You photograph a garment on a mannequin, then a retoucher removes the mannequin and rebuilds the parts it was hiding, usually the inside of the neck and the back of the collar. The result looks as if the garment is being worn by an invisible person: it has shape and volume, but nothing distracts from the product. It is one of the most common looks for apparel on marketplaces and fashion stores, because it keeps every product in a range consistent.
The part that takes skill is the rebuild, which retouchers call the neck joint. It is made from a second photo of the inside of the garment, and if that photo is missing or shot differently, the retoucher has to invent what was never photographed.

What you need before the shoot
- A mannequin with removable parts. The neck plate, chest panel and arms should come off, ideally with magnets rather than screws. You will remove the neck plate for the inside shot.
- The right size. Match the mannequin to your sample size. Too big and the fabric pulls and the buttons gap; too small and the garment hangs flat and loses its shape.
- A tripod. Not optional. The front, back and inside shots need to line up.
- Two soft lights and, if you want a clean white background in camera, a third light on the backdrop.
- A styling kit: steamer, pins, clamps, tissue paper, a lint roller and a grey card.
Step 1: Style the garment like it’s on a person
Steam the garment on the mannequin, not on a hanger, so the creases you remove are the ones the camera will see. Pin or clamp any excess fabric at the back, where the front shot won’t show it. Fill sleeves lightly with tissue so they hold a natural curve instead of collapsing. Button and zip the garment the way you want it sold, and check that the hem, the shoulders and the placket are level.
Every crease and visible pin you leave becomes retouching time. A few minutes with a steamer is cheaper than paying someone to rebuild a sleeve.
Step 2: Lock the camera
Once you find your framing, don’t touch it for that garment. Use a mid-length lens, around 70 to 100mm on a full-frame camera, so the garment isn’t distorted at the edges. Shoot at f/8 to f/11 so the whole garment is sharp from collar to hem, at your camera’s base ISO. Set white balance manually from a grey card. Auto white balance shifts with each garment’s color, and that drift shows up as a mismatch between the front and the back.
Leave space around the garment. If the sleeves touch the edge of the frame, the retoucher has to extend the background before cropping to your margins.
Step 3: Light it evenly, and keep it that way
Two softboxes at about 45 degrees on either side give even light with soft shadows. Hard light creates deep shadows inside collars and under lapels, and those are hard to clean up without making the garment look flat. Whatever you choose, keep it identical for the front, back and inside shots. If the light changes between them, the neck joint won’t match the garment around it.
Step 4: Take every shot the edit needs
For a typical top or jacket, that means:
- Front, on the mannequin.
- Back, on the mannequin, same framing.
- Inside neck. Remove the neck plate, or turn the garment so the inside back of the collar faces the camera, and shoot it from the same height and distance. Make sure any printed or woven label is readable.
- Details your product page uses: fabric close-up, buttons, hardware, prints.
Trousers and skirts need an inside waistband shot instead of a neck shot. Open cuffs, hoods and deep V-necks may need an extra inside shot too. When in doubt, take it. An extra frame costs a second. A missing one can mean a reshoot.
The mistakes that cost the most in the edit
| At the shoot | What it does to the edit | Fix |
|---|---|---|
| No inside neck shot | The retoucher has to invent the inner collar. Labels can’t be invented at all. | Shoot the inside for every style, every time. |
| Mannequin the wrong size | Pulling fabric, gaping buttons or a flat, shapeless garment. | Match the mannequin to the sample size. |
| Light or white balance changed between shots | The neck joint is a different color from the garment around it. | Lock lights, exposure and white balance per garment. |
| Pins and clamps visible from the front | Clean-up on every frame. | Pin at the back, check the live view before shooting. |
| Creases and lint | Slow retouching, and texture can look smeared. | Steam on the mannequin, lint roll before each shot. |
| Garment touching the frame edge | Background has to be extended before cropping. | Leave a clear margin on every side. |
How the shoot changes your price
We grade every ghost mannequin image Basic, Advanced or Complex: $2.50, $4.00 or $6.00 at our current prices. A well-prepared set is mostly Basic and Advanced work. Missing inside shots, heavy creases, visible pins and sheer fabric are what push an image to Complex. So the cheapest way to cut your editing bill isn’t a cheaper studio. It’s a better shoot.
Sending the files
- Send RAW files or the highest-quality JPEG your camera makes.
- Put each style in its own folder, and name files by SKU and view, for example
SKU123_front,SKU123_back,SKU123_neck. - Include one line on the finish you want: background color, shadow, crop and size. Our how it works page has a short brief you can copy.
Ghost mannequin photography questions
Can you edit ghost mannequin images without an inside neck shot?
Yes, for plain necklines we can rebuild a clean inner collar. We can’t recreate a printed or woven label we’ve never seen, and complex collars always look better from a real photo.
Is ghost mannequin better than flat lay?
Ghost mannequin shows fit and volume, which suits tailoring, outerwear and knitwear. Flat lay is quicker to shoot and works well for basics, kidswear and accessories. Many stores use ghost mannequin on the main image and flat lay for detail shots.
Can AI tools do the neck joint?
They can remove a mannequin from a simple shot, but they tend to invent the inside of the collar, and any label text comes out as nonsense. For a product page, the neck needs to match the real garment, which means a real inside shot and a person putting it together.
Can ghost mannequin photos be used for AI model images later?
Yes, and they make the best starting point because they show the garment’s true shape. See AI fashion models.
Want to see what your current shoot setup produces? Send us three styles with front, back and inside shots and we’ll edit them free, with notes on anything that would make the next shoot easier. More about our ghost mannequin service.
The Clipping Lab Journal, from the post-production studio Korno Hasan founded in Kushtia in 2012. About the studio →
Your next 3 images are on us.
Send them tonight. See them finished tomorrow, with a quote for the rest.
- Back within 24 hours, usually sooner
- No card, no contract
- Your files stay private